Week 1: Blender Basics
"Here be my developer log, containing all my portfolio work for KIT207. Tread here if you dare..."
~ Nathan Johns (12.07.2023)
Week 1: Blender Basics
Now, coming into this, I should make you aware that I have absolutely zero experience using blender or even just creating models; so please, don't expect works of art comparable to pieces by Picasso, or any other artist for that matter.
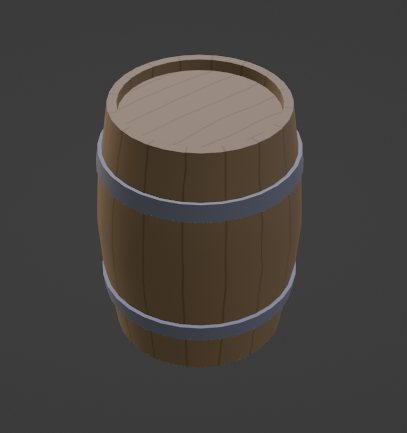
To begin my journey into the wild world of Blenderin'™, I first started with something that is apparently tradition at this point... the creation of a barrel.
... Brackey's Barrel!

With the help of SirPinkBeard's video (link), I was able to relatively easily follow the instructions to create this fine piece of artwork. Some things, of course, were different from depicted in the video, which was created for an older version of unity. These were only simply aspects of the modelling, such as changing the UV map stretching and applying the modifiers to the model.
Notably, I had trouble with the painting aspect of the tutorial, but this was likely due to my poor following of the steps. I had the issue of the red and green minuses that appear on the undrawn map ruining my fill tool, and leaving a bunch of the aforementioned uglies across the barrel. I simply had to adjust the fill properties of the tool to have a higher 'Fill Threshold', which made the fill tool paint over the nuisances. After that, it was smooth sailing, and I've got to say; I'm pretty pleased with how the colours came out on the barrel - I think it looks nice.
One thing to take note of is that with the proper creation of UV maps, the painting aspect of a model can be made easier. With overlapping UVS, texture can be copied from one part to the next easy, and simplify the overall work required.
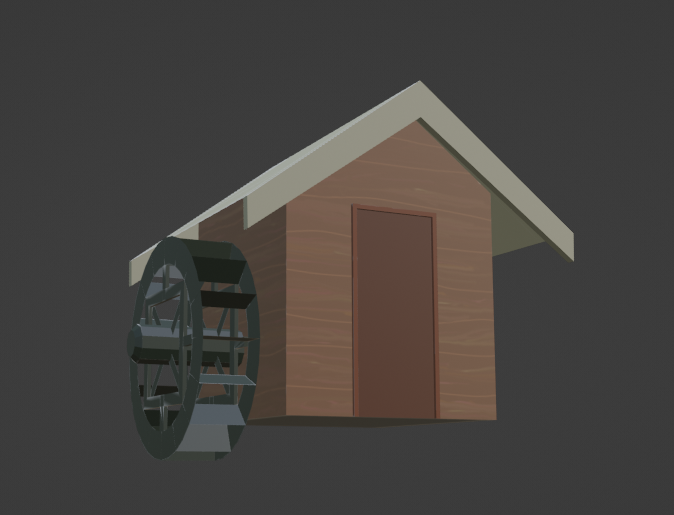
My own silly model!

Yes, I am well aware this might be a colouring attempt on par with what a child might draw with crayons on a piece of paper... well aware. However, I will be the first to admit that I am absolutely no artist - I'll leave creating the masterpieces to the professionals.
This piece was assembled with the knowledge I gained from the aforementioned Youtube tutorial, although the construction of this model was (understandably) more complex than simply making a cylinder and inflating it. First, it started with the construction of the body of the water wheel, which was relatively simple. A box was used and scaled to a correct size. The next part, which was incredibly more confusing for my lack of Blender experience, was to make the roof - I achieved this by removing the top face of the cube and adding triangles to two top sides. I then attached them with faces, before extending those faces out from the edges of building. Finally, I adding the supporting beams to the roof by cutting a line into each side and extruding it downwards.
...
Simple, right?
Don't worry, the wheel itself was SO much easier (sarcasm). The wheel was made with a cylinder - I know, original - which I then removed the sides from, created two circles next to each other. I created smaller circles within those circles to make a platform to create the buckets of the waterwheel (they aren't supposed to be flat, but I thought it would be too difficult to fix). After the buckets came the most tedious thing yet, creating the supports beams of the waterwheel. This was done by the creation of a square, with a smaller square within. I connected this square by creating beams from the corners and top, and sides.
Finally, it was done!
I then spent a few moments doing up a paint job for the waterwheel. This was made much more difficult due to the fact that I hadn't created the waterwheel perfectly even beforehand, so I wasn't able to mirror the paint job with a properly made UV map in many places. I was able to mirror the walls and the buckets of the waterwheel, however, the roof was not at all even, and too difficult for me to figure out how to paint (I cheaped out and painted it with two colours).
For reference, the actual thing!

UTAS KIT207 Portfolio
| Status | Released |
| Category | Assets |
| Author | utas_nathan |
More posts
- Week 5: Lighting and ShadergraphsAug 14, 2023
- Week 4 (part 2): Game IdeasAug 06, 2023
- Week 4: Navmeshes and Simple MechanicsAug 06, 2023
- Week 3: Unity terrain and movementJul 31, 2023
- Week 2: Pain and SufferingJul 24, 2023